Sunday 9 December 2012

A spurt of progress just before Christmas

So, one of my fellow caravan friends gave me their two most recent copies of "Caravan Magazine". I love this magazine as it gives some really useful tips on the best time to go out in your van, some lovely sites and stories of caravanning in a certain year. In the November / December edition, they concentrated on 1962. I know this is a good ten years before our van was built, but it also talks about the progress of caravans through different years. And on one of the years was the "1975 Elddis Tornado". The little photo is lovely as it looks just like good old Morris! Seeing this reminded me why I was doing the work in the first place and motivated me into getting more done.

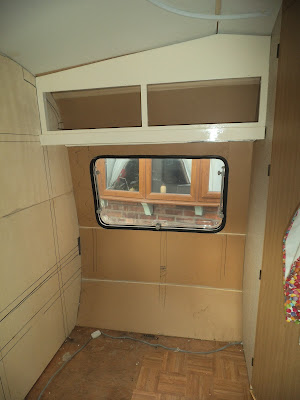
Therefore, this morning, I was up, ready and working in the van by 10am (this is very early for me) and by 2pm, had managed (with a little help from a reluctant Pete) to finish the "blue" wallpaper at the back of the van, and if I say so myself, think it looks pretty fetching! Here's some pics.


Also, I asked Pete to fit the cupboard door where my stripes have finished drying. I am still not convinced by these - but maybe this is because it is a bit out of context at the mo. Unfortunately, whilst this was being fitted, some of the cream paint (that I think is a load of old rubbish now BTW) has chipped (yet again)! I am therefore going to search for some better cream paint to go over the top of this, and to start the the front bits a-fresh with the new paint.


Thanks for reading and have a nice Christmas!

Tanya (and Pete).

Sunday 25 November 2012

Finally, a bit of sophistication

So finally, I have managed to introduce a bit of sophistication into our quirky little Morris. I want to keep the "shabby chiq" style with the bunting and the nautical theme, but I wanted to contrast this with the expensive look wall coverings that I saw in the caravan book as quoted in one of my previous posts.

I have therefore bought a lovely wallpaper from B&Q in deep blue. It is covered in a floral pattern that is raised, thus giving texture to the walls, but I am only adding it to the ends of the van so as not to make it look too small. It has taken quite a while to prepare for this. As well as ensuring the walls are clean, I have had to mix up a quantity of paste and paint the walls allowing to dry first. This ensures that the paper is going to stick very well and not peel in the future as the wooden boards it is attached to aren't porous. The only warning I would give with this is that the wallpaper sticks so well, you need to ensure it is in the right place as it doesn't "slide" like it would usually.

Here's a pic:


In contrast, I have gone for something fairly plain and still along the nautical theme for the cupboard doors - a light blue stripe in the same "holiday blue" as the exterior. The only slight problem I have faced - even through it was a number of days since I finished the stripes, they still feel rather tacky. I am therefore going to wait and see how long it takes for them to dry before starting any more. Here's a sneak peek!


Next steps? Well to be honest, it is only a few weeks now til Christmas, it is very cold in the van (it is not plugged into the electrics whilst sat on the drive) and we are going away at some point, so I don't think we will make much further progress before then. However, as long as the light blue paint sets on my cupboard doors, I would like to get a few more painted with different size and shapes stripes to add to that higgeldy piggeldy look. I would also like to finish off the wallpapering at the back of the van and get the cupboard doors back on. I would also like to get a few more cushion covers completed at my mother in laws house. So, I probably won't write for a few weeks and update again when I have made more progress.

Then after xmas - need to pull apart the front interior of the van and do the curtains / floor. Exciting!!

Thanks for reading.

Saturday 10 November 2012

A u-turn on the interior!!

So, I must admit, renovating Morris has been quite a bit of fun (and frustration) in our household, but it has also taught me a number of new skills that will be handy going into the future. So last weekend, me and my mother-in-law Erica spent a day starting to re-upholster the cushions at the front of the van. As you may remember, a few months ago, I purchased a large amount of biscuit coloured material on sale at Dunelm due to it being at the end of a roll. Last weekend, we cut out the first cushion and I had my maiden attempt at using a sowing machine. This was no where near as bad as I pictured, but I must admit, after a days work, I had only done the long straight seams, leaving the difficult bits to Erica, and had only managed to create one cushion (which we hadn't finished due to the need to purchase velcro). But, never mind, it's a start at least!


We have also continued painting the interior of the cupboards and shelves that have been expertly re-attached by Pete.


Now, I bet you're wondering what the "U-turn" title relates to? Well, as you know, I have covered the cupboard doors in a plastic sticker to look like "boat wood". I really like the effect and think it adds a warmth to the interior. HOWEVER, it also looks scruffy at the back when you open the doors and it peels up at the edges. I have therefore decided that I am going to remove the covering, and instead hand paint some "beach" themed stripes in a cute type of way onto the cupboard doors. I will do these stripes in the same blue that is on the exterior of the van to link the interior and exterior together. Hope you think this is a good idea, as I am going to start this tomorrow!!

And finally, I think I may not have enough of the "biscuit" material to cover all the cushions and to complete the curtains. Therefore, on the "AbaKhans" website I have found this:

Chenille Stripe Navy 150cm

I am hoping this will link to the biscuit, keep the beach theme going, and will link to the dark blue wallpaper I am soon going to be adding to the back and front. 

So, not sure if I am making much progress but I hope it will show itself soon!!

Thanks for reading again, Tan :)

Sunday 21 October 2012

Finally work has re-started ...

So due to a variety of other commitments (holidays, family circumstances etc.) work stopped for a number of weeks on Morris the caravan. This was the cause of much frustration as we are getting ever nearer our May 2013 deadline.

However, over the last two weekends, progress has been made. Last weekend, we finally received our second batch of Sikaflex and were able to complete the re-seal of the entire exterior. Finally I can now say that Morris is entirely water tight.

We made more visual progress this weekend though. We, today, managed to insert the corner cupboard at the rear end of the van. We decided to add this before completing the wallpapering due to fear of scratching the covering when adding the woodwork, We were also concerned that we would be unable to determine the location of the batons to screw the shelves into once the paper was up. Pete therefore fixed the first one on today (my help mainly consisted of passing tools whilst chatting on the phone to a friend!) and he then put a thin second coat of specialist melamine cream paint onto the wood work (I obviously couldn't do this as I have just had my nails done).


I did, however, add some silver tape to the trim on the cupboard doors to prevent peeling.


So OK I admit it, not loads of progress, but enough to feel that we have done something. We have decided to spend an entire day next weekend on Morris so that we can add the remaining shelves and the paper. Will update then!

Thanks for reading!

Tanya

Friday 24 August 2012

Away again, my poor garden!!

So, it has only been 4 weeks since we were last away in Morris and we are getting ready to go away again!

Since our maiden voyage, quite a few developments have been made with Morris. The complete exterior is now painted and mostly sealed. Not finished with sealing unfortunately, due to running out of sealant part way through the job so am going to have to purchase some more of the amazing stuff off the Internet.

Here are some pics of the outside all finished!!

This photo shows the effect of adding B&Q basic paint stripper. After only a few minutes, the paint is just flaking off. After a sand and a clean, we get to this!


As you know from my last post, I have also purchase some accessories for the van, and here they are in situ!


So, now the outside is finished, what next? To be honest, both me and Pete are knackered and the thought of continuing with the project is a little daunting. However, work must continue if we are going to meet our deadline of May 2013. Therefore, over the next few months, we need to remove the front end of the van inside and re-build the timber framing (from initial peeks and feeling the condition of the interior wall, we suspect that a complete re-build will be required as per the back). We then need to paper the interior (have found some sumptuous dark blue paper for the two ends and some cream paper with sparkles in for the rest), paint / cover the internal woodwork, create new covers for cushions and curtains with the material I have bought and finally fit new flooring.

We also need to create new tables / covers for the kitchen areas from white washed wood (to go with the nautical theme) and consider adding a sink to the bathroom area. However, neither of these things seem "necessary" at the mo, and we are quite enjoying using the loo area for storage so we need to think carefully before diving into doing this. Any comments / thoughts about next steps gratefully received!

Thanks, as always, for reading,

Tan and Pete :)

Sunday 5 August 2012

Back from our trip and progress already!

So, I hope you are all keeping well?

We are just back from our maiden voyage with Morris and had a lovely time. Our campsite near Much Wenlock in Shropshire was lovely and we managed to get all the way there and back again (I read the Hobbit whilst I was there) without any major incidents. When we arrived, the van was still together. Only problem, I decided to go off for a walk with the dog whilst Pete prepared the caravan for when I got back. Only thing, I didn't realised I had the caravan keys in my pocket so when I arrived back at the site an hour later, Pete was still sat outside waiting for me! Oops!

Anyway, the campsite was called Sytche Caravan and Camping and was great. Not only were the facilities brill, there was a great 10-15 min walk through the woods where the dog could run off her energy into the town. Here is the website and I have put a few pics below:
http://www.sytchecaravanandcamping.co.uk/


The other lovely thing was that whilst we were there, an old school friend of mine turned up at the site (this wasn't planned) with her family and vintage caravan so it was great to see her too. I will find out if I can add some pictures of her caravan to my blog as it is really funky!!

However, there is no rest of the wicked! And even though this is our first weekend back, the work continues. This weekend I have been out shopping on Saturday and have bought some cushions and accessories for inside Morris (all bargains of course) and I have managed to buy some really good material on sale at Dunelm Mill to cover the sofa seats. Pics below.


Also, we have spent a great deal of today (Sunday) attempting to remove the trim pieces on the other side of the van ready for painting. Has been a real pain to be honest with many of them rounded off. We have therefore had to use a series of drill bits to get them free. Is done now though and is almost ready for its first coat of paint. I am hoping with a nice bit of weather one evening this week, I can get it done.

At some stage we could get it looking like this:


Finally I thought I would just show you this brilliant book that I have recently bought from Amazon. It is called "My Cool Caravan" written by Jane Field-Lewis (big up the double barralled name!!) and Chris Haddon. Is a really inspirational read and I have added below a couple of photos of one van that has really caught my eye! Hope you enjoy reading this and I will update again once more work has been done!

Thanks for reading, Tanya :)


Wednesday 18 July 2012

Looking pretty (but not too pretty - by Pete's orders!)

Just thought I would do one last update before our road trip. I have now made a number of additions to Morris to get him looking ship shape. I have added bunting, beach themed lavender hearts and have filled his cupboards with scrummy food!!

Here's a sneak peek!!

As always, thanks for reading!!


Monday 16 July 2012

Just about ready for our first road trip!

So, we have had a mega weekend working on Morris, I am totally knackered! However, it has all been worth it as we are now ready for my birthday treat, our first weekend away in our van.

One huge bit of work we have done that has made a big difference is finally having enough nice weather to paint the exterior of 2 sides of the van. We have painted the top an antique white, and the whole of the bottom half (not just a stripe as previously) in "holiday blue". I am really pleased with the colour as it looks a bit like a sunny sky and follows the nautical theme that we are going with.


Pete has also made massive progress with the interior. Not only has he sealed the leak and made the back end of Morris water tight, but has fitted a new interior timber frame, filled inbetween with polystyrene and finally cut and fitted the plywood boards. We have drawn the timber frames behind onto the front of the ply wood so that we can see where we are screwing the shelving units back in. You won't be able to see this when we are finished as we are going to re-wallpaper.


Once we are back from our short break, we will need to crack on with sealing and re-building the front end of Morris as this is damp also, and painting the other two sides of the van. It is then just a case of making cosmetic changes like re-wallpapering, covering the interior cupboard doors, painting the cream areas and replacing the floor and lights. We are going to do this at a much slower pace however, so that we can ensure we meet our deadline for May 2013, but is not going to tire us out in the meantime! I may therefore update this blog slightly less regularly, but will make sure that when I do, it is even more exciting!

Thanks for reading,

Tanya and Pete

Sunday 8 July 2012

Huge jumps forward!

I didn't update the blog last week, more out of frustration than anything else. I spent a great deal of last weekend preparing for putting a white undercoat on one side of Morris, and Pete (my husband) continued to re-build the internal frame in the bottom left corner.

Unfortunately, the weather turned horrific and we had to abandon our hopes at getting a great deal done. This felt very disheartening and put me off doing much on Morris until the weather cheered up. It did cheer up and we had quite a nice evening on Thursday. I still wasn't quite in the caravan mood however, and instead went for a walk up some hills in the sunshine, stopping off at a lovely pub on the way home for a bowl of chips whilst watching the sunset.

So this weekend, I thought I should really make up for my neglect. I therefore got up early on Saturday morning, and proceeded to go and get my hair styled and had some beauty treatments. Don't worry, all is not lost for Morris, as I then came home and spent the afternoon continuing my painting prep whilst Pete did more work inside.

Then this morning (a Sunday!!) I was up at 8:30am adding the white external paint to one side. Whilst this was drying, I prepared and also painted the rear of the van. I used a paint recommended on a number of caravan forums. This is called "Tinkers Paint". (I apologise if this name is a little non pc - this is what it is called!). This is basically 75% exterior gloss paint and 25% yatch varnish.

After painting prep last weekend:


After first coat of Tinkers Paint - I feel another coat will be necessary - however the top half of Morris will remain white, from the bottom trim, we have chosen a lovely light blue colour - the Dulux Name for this is aptly "Holiday Blues":


And here is the bottom coat also on the rear of the van:


Whilst I worked on the oustide, Pete carried on his stirling work on the interior of the van. Here it is now most of the frame work is in. This has now prevented any water coming in at the back of the van, and all there is to do is add some polysterene (my neighbour has very kindly given us lots of this), add the ply wood boards and paper.


This message I am hoping will be read in another 30 years time, when Morris has continued to give families (including mine) lovely DRY holidays!!

I hope you agree that our work is progressing. It better had be as we have booked to go away in Morris the van very soon!

Thanks for reading, Tanya and Pete :)